This applet handles two-dimensional two-class datasets
- i.e. collections of instances represented by two attributes (the X and
Y coordinates), and two classes (represented by the colors red and blue).
Defining a classification problem
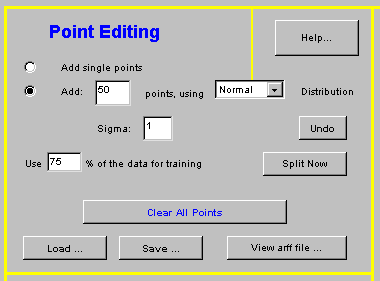
To generate a new classification problem, simply add instances to the white area on the right. Use the left mouse button to add blue instances and the right one to add red instances.
You can choose between adding single instances, which are created at the exact position of the mouse click, or between adding multiple instances. Any number of instances can be added using normal (Gaussian) or uniform distributions, both centered at the position where the mouse was clicked. When you add normally distributed multiple instances in one click, you may control the amount of area covered by changing the standard deviation (the sigma parameter). Uniform distributions can be used for adding noise to the problem.
Classification is performed after training a classifier over a training set, which is a subset of all instances; its size can be determined by changing the value in the ?Use ___% of the data for training? field. The remaining instances will be used as test cases, to measure the quality of the learned classifier. Press the ?Split Now? button for a visual representation of the training instances that participate in the classification ? they will become ?filled? as opposed to the non-participating instances which will remain outlined. If you are not happy with the split (which is random), you may press the button again (with or without changing the split factor) until the split appears satisfactory.
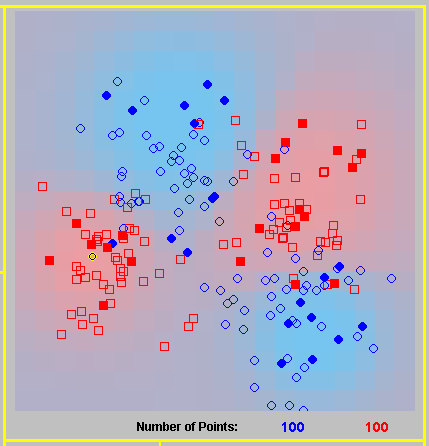
The total number of points for each class is listed just below the points.

Note that LocBoost, as well as other classifiers such as KNN and other algorithms, require some heavy computations, and generating large numbers of instances may result in long running times. Typically, problems of a few hundred instances run in short times. If you have larger problems, you may use the ?Split? feature to limit the amount of instances that will actually take part in the classification.
You may undo any previous addition of instances by using the ?Undo? button. There is no limit on number of undo steps, but there is no ?redo? feature currently.
Use the ?Load..? and ?Save?? buttons to access pre-defined problems and save your own ones. Due to security limitations, the save feature will work only if you are running the applet locally and not through the web.
?Clear All Points? is self explanatory.
Use the ?View arff file?? button to examine a textual
description of the problem defined. The syntax of this textual representation
is Weka?s internal syntax for representing classification
problems, so you may save it and use it in other Weka-based analyses
Classifying
The central part of the applet controls the classification
process.
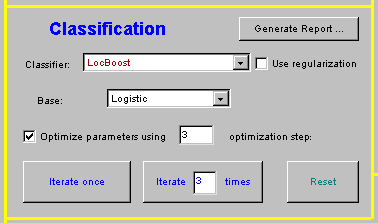
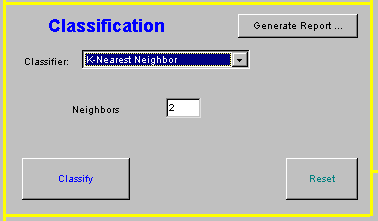
First, select a classifier from the list next to ?Classifier:?. The appearance of the rest of the panel may change according to the selected classifier, providing means to change parameters of the classifier and control it.
In the case of meta-classifers such as LocBoost or AdaBoost, you will also need to select a base classifier to boost, from the list next to ?Base:?. Since LocBoost enables you to control each iteration separately, you may also change this base classifier between iterations, creating a booster that is composed of several different bases.
Almost all classifiers allow some of their parameters to be changed - in the example above (KNN classifier), the number of neighbors taken into account can be determined; Select a classifier from the list to see what parameters are accessible.
For all classifiers except LocBoost. press ?Classify? to perform the classification on the problem defined.
For LocBoost, the ?Classify? button will be replaced with buttons that allow you to step once or any amount of steps through the boosting.
The ?Reset? button clears the results of the current classifier, without erasing the dataset and its split (as opposed to ?Clear all Points mentioned before, which resets the classifier and also removes the instances).
?Generate Report? displays a textual report of the classification process after it's been finished; in case of boosting, the report will include a detailed report of each iteration.
After pressing ?classify?, or ?iterate?, a visual representation of the classifier's decision will be drawn on the left, where the dataset is represented as points:
What is going on?
The bottom parts of the applet gives you some information about the classification process and allow you to control some of the visual interface.
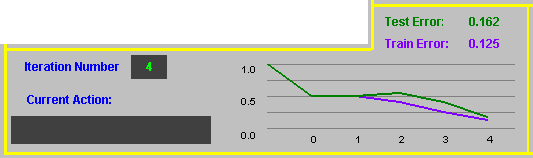
On the left, there is an indication of the current stage of the applet (parsing the instances, classifying, drawing the boundaries etc), and the current iteration number (in case of LocBoost).
In the center, there is an indication of the error
of the classifier both for the train set and the test set. In case of LocBoost,
the error rates are calculated after each iteration and presented on a
graph in different colors. The graph is always ?best fit? - all the iterations
will fit inside the same area.
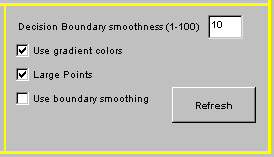
?Desicion boundary smoothness? allows you to select the smoothness of the decision boundaries drawn (higher values mean smoother boundaries, but it takes longer times to draw them).
Choose ?Use gradient colors? to see a smooth transition for one color to the other based on the classifier?s confidence, or leave it empty to see a yes/no decision (which may be clearer).
You may use ?boundary smoothing? to create smoother boundaries even with a low ?smoothness? factor, by automatically increasing the resolution of the boundary where a class is changed (this is good only for non-gradient appearance).
Select or deselect ?Large Points? to switch between a large representation of each instance and a smaller one, which is usefull to view the desicion boundaries more sharply.
Press ?refresh? to repaint the canvas.